DIY St. Patrick's Day Rainbow Garland Using the Cricut Scoring Wheel
/This is a sponsored conversation written by me on behalf of Cricut. The opinions and text are all mine. Affiliate links are included in this post, which means If you purchase something through the links, I may receive a small commission at no extra charge to you.


If you’re planning a St. Patrick’s Day Party or if you’re looking for some cute St. Patrick’s Day decorations for around your house, I’ve got the cutest idea to share with you today! This adorable little DIY Rainbow Garland is modern, fun, and perfect for party or home decor!
I’ll be honest. I do a lot of projects for work that I either end up giving away or donating because I just don’t have the room to store them all. Every once in a while I’ll keep the really special ones because I can’t bring myself part with them. You guys, this one is a keeper! It is sooooo darn pretty in person…I can’t stop lovin’ on it!

How to Make A DIY St. Patrick’s Day Rainbow Garland
What You’ll Need:
・Cardstock in a rainbow of colors
・Twine
・Hot glue
・This project and this project in Design Space

This garland is really easy to make, but it does take some time and it takes quite a bit of cutting and folding. Thanks to the Cricut Maker and the all new Scoring Wheel, the cutting and scoring part was a cinch (and sooooo much faster than trying to cut and fold the circles perfectly in half by hand)!!!
If you’ve been following me for a while, you know that I have several Cricut cutting machines and lots of the fun tools and gadgets. I chose to use the Maker and Scoring Wheel intentionally for this project, and here’s why. When you’re folding cardstock, it’s super important to have a strong crease for precise folds. I’ve used the Scoring Stylus on card stock before and sometimes found myself frustrated because the crease wasn’t deep enough to create a seamless fold. I’ve had to re-cut and re-crease many times because the paper didn’t crease well, which resulted in a bad fold and a wasted cut of paper. The Scoring Wheel (made specifically for the Maker’s Adaptive Tool System), however, applies 10 times more pressure than the Scoring Stylus. It truly makes perfect creases and makes folding sooooo much easier!!!

To begin making this adorable St. Patrick’s Day Rainbow Garland, open this project in Design Space.
Click “Make It,” then follow the prompts on the screen. Since you’re working with paper and want to be able to get it off of the mat without tearing, I highly suggest using a Light Grip Mat here. If you don’t have one, use a well-used, not-so-sticky Standard Grip Mat.
Be sure to choose the appropriate material (80 lb. cardstock if you’re using Cricut paper), and load the Scoring Wheel into Clamp B. Once the scoring is complete, you’ll be prompted to replace the wheel with the Fine Point Blade. You do not need to unload the mat to do this.
Once the cutting is complete, unload the mat and admire your perfectly cut and scored circles! Seriously, y’all…they’re perfect. Repeat until all of your card stock is cut and scored.
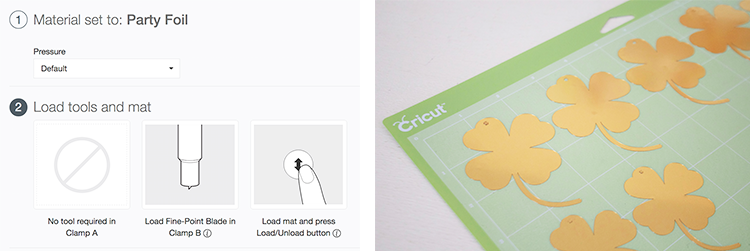

Next, place the Party Foil on a Standard Grip Mat and follow the prompts to cut. When you’re all done, you’ll have a pile that looks similar to the one above. Does it look like a giant pile of rainbow colored tacos to anyone else or am I just hungry???

Now it’s time to put it all together!
Start by threading the shamrocks onto the twine.
Then, glue the folds of eight of the same-colored circles together to create the 3D spheres. Before gluing the last two folds together, add a line of hot glue down the center and add the twine. Glue the final circle folds together.
Continue to do this until all of the spheres are added, sliding some shamrocks in between as you go along.

And there you have it! The most spectacular little St. Paddy’s Day Garland that you ever did see!
Use it to dress up your party space, your mantel, or any little shelf you have hanging in your home. You’re gonna love it!!!