DIY Holiday Gift Tags Using the Cricut Maker
/
I absolutely love wrapping pretty gifts to go under the Christmas tree! If you ask my family, they may even tell you I’m a little obsessive about it. But there’s something so special about receiving a beautifully wrapped present, isn’t there? I mean, if there were a dozen gifts under the tree, and only one of them was tied up with a pretty ribbon and tag, wouldn’t you wish that the jazzed up one was for you? Exactly. Plus, the gifts under the tree are basically house decor until they get opened, so why shouldn’t they look nice? I know y’all get me. My family just doesn’t know any better. ;)
How to Make DIY Holiday Gift Tags Using the Cricut Maker
I also wanted to create some 3D designs using acetate, and the Maker has a scoring wheel that is capable of scoring the acetate so that it can be folded, something that the scoring stylus isn’t quite strong enough for.
If you have a Maker, fire that baby up and let’s get started! If you don’t have a Maker yet, you’re probably going to want one after reading this post. Put it on your Christmas list and tell Santa he can shop here. ;)


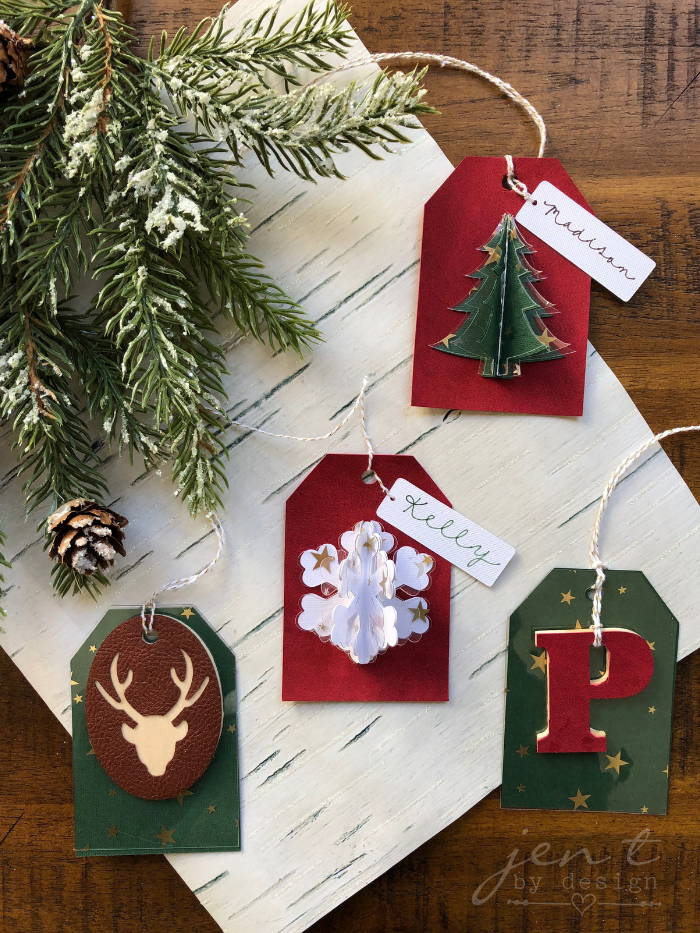
Let’s start off with the 3D DIY Holiday Gift Tags. The how-to is basically the same for both the snowflake and the tree, so I’ll walk you through one project and you can just apply it to whichever one you choose to make.
For the Tree or Snowflake DIY Holiday Gift Tags You’ll Need:
- This project in Design Space
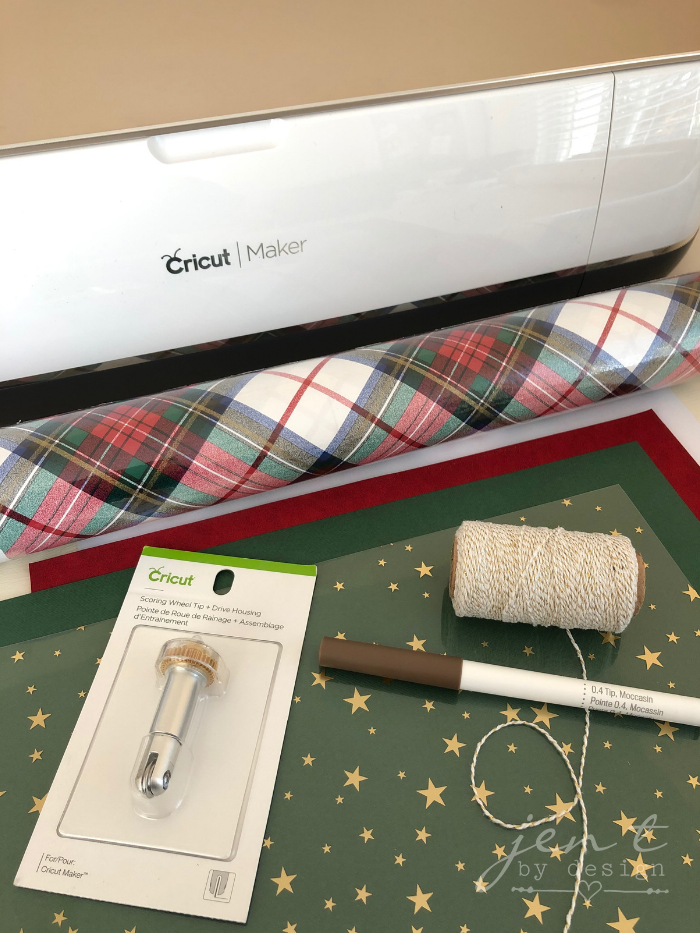
- Cricut Scoring Wheel
- Cricut Rotary Blade (included with Maker)
- Cricut Fine Point Blade (included with Maker)
- Red Suede Material or Cricut Faux Suede (the Maker can cut suede up to 2.4 mm {3/32”} thick)
- Green Card Stock
- Light Grip Mat
- Foil Acetate Sheets
- Standard Grip Mat
- White Card Stock
- Cricut Pen in Moccasin or Sour Apple
- Clear Craft Glue
- Glue Gun
- Baker’s Twine or Ribbon

Load the white card stock onto a Light Grip Mat. Load the pen into Clamp A, and the Fine Point Blade into Clamp B, then follow the prompts on the screen to write and cut. Unload mat.

Peel the backing off of the Foil Acetate Sheet, then load onto a Standard Grip Mat. Remove the pen from Clamp A, then remove the Fine Point Blade from Clamp B and load the Scoring Wheel into Clamp B. Load the mat, then click the “go” button to score. WITHOUT REMOVING THE MAT, remove the Scoring Wheel and replace the Fine Point Blade. Follow the prompts to cut. Fold the trees along the score line.
Load the green card stock onto the Light Grip Mat to cut the paper trees.

Fold the trees along the score lines. Apply a light coat of glue to one side of a folded tree, then adhere one side of the second folded tree to it. Once secure, repeat to attach the third tree.
Apply a very light layer of hot glue along the fold of each acetate tree (hot glue is visible when dry, so be sure to apply sparingly), and adhere to the inside folds of the paper trees. Hot glue the flat back layers of the trees to the suede tag bases, then use twine to attach the gift name tag.


For the Bass Wood Monogram and Deer DIY Holiday Gift Tags You’ll Need:
Once again, the concept for these tags is the same, so I’ll walk you through one, and you can apply the same techniques to both. The only difference will be if you choose to use suede (like I did on the monogram), or leather (like I did with the deer).
- This project in Cricut Design Space
- Cricut Knife Blade
- Cricut Scoring Wheel
- Red Suede or Cricut Faux Red Suede OR
- Cricut Copper Faux Leather
- Green Card Stock
- Light Grip Mat
- Foil Acetate Sheets
- Bass Wood (max 2.4 mm or 3/32” thick)
- Strong Grip Mat
- Masking Tape
- Clear Craft Glue
- Baker’s Twine or Ribbon


Place the Foil Acetate on a Standard Grip Mat. Place the Fine Point Blade in Clamp B, then follow the prompts to cut.
Unload the mat, then place the card stock on a Light Grip Mat. Follow the prompts to cut.

If you have never used your knife blade before, you will want to calibrate it first. Directions for calibrating your Knife Blade can be found here.
Next, you’ll want to slide the star wheels (the white wheels on the roller bar) all the way to the right. Make sure that the width of your bass wood is no larger than 11.5 inches, then tape the wood to the Strong Grip Mat using masking tape or painters tape. Load the Knife Blade into Clamp B, then begin cutting.

After the machine has made one full pass on the design, it will tell you how many more passes are needed to cut all the way through the wood. Once all of the passes are complete, WITHOUT UNLOADING THE MAT, you’ll want to check to see if the wood has been cut all the way through. If it has, you may unload the mat. If it hasn’t you’ll hit the “C” go button again to create another pass. Continue doing that until the wood has been cut all the way through.

Next, you’ll either cut the suede or leather to go on top of your wood piece. If you are cutting the faux leather, be sure to turn mirror image “on” before cutting, and place the material face down on the mat.

Once all of your pieces are cut, apply a thin layer of glue to the suede or leather, then secure onto the wood. Use twine to string the tags and wood pieces together.

If you’re feeling super creative, use these ideas as stepping stones to create your own unique tags. There are so many holiday images in Design Space that you can incorporate…the possibilities are endless!
As always, if you decide to give these ideas a whirl, be sure to tag me on social media (@JenTbyDesign on the platforms below) so I can see your awesome creations!
Have fun, and Merry Christmas to you!!! xoxoxo, Jen ❤︎
If you like these ideas, please "Like," "Pin," "Share" or "Tweet!" Or, you can just shout it from the rooftops, if that's your thing. Thanks bunches!!! :)
This is a sponsored conversation written by me on behalf of Cricut. The opinions and text are all mine. Affiliate links are included in this post, which means If you purchase something through a link, I may receive a small commission at no extra charge to you.