DIY Tile Coasters with Cricut Permanent Vinyl
/
Summer is in full swing, and I don't know about where y'all live, but here in Virginia it's been hot! We've definitely been doing our share of summertime sippin' to keep cool, but you won't hear me complain about that. ;)
In the spirit of sippin,' today's post is a super cute, summer-inspired project, which just so happens to be the perfect resting spot for your summer sips...DIY Tile Coasters.
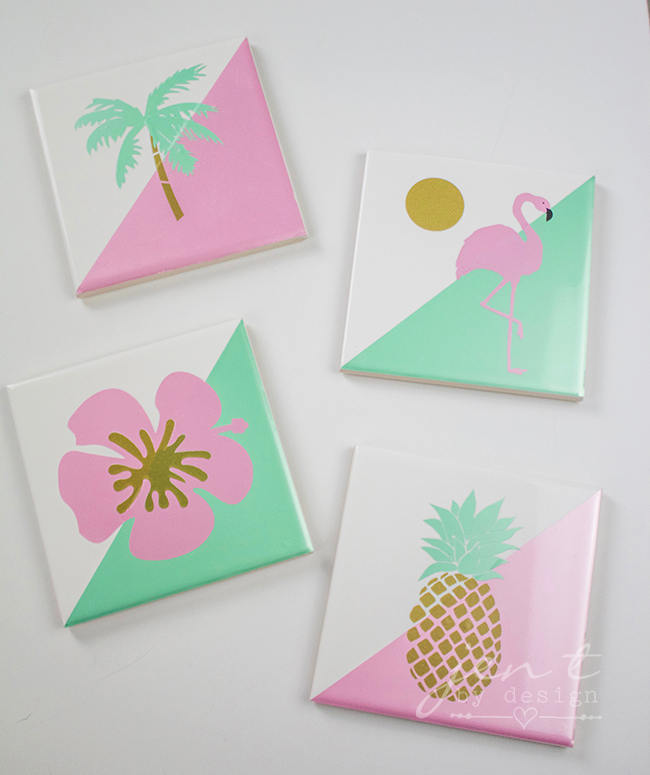
This DIY Coaster Set features four fun designs that are cut out of Cricut Premium Vinyl using a Cricut Explore (or other Cricut cutting machine).
For this project I used a pineapple, a flamingo, a palm tree, and a hibiscus, all of which are available in Cricut Design Space, but you can totally mix and match the designs however your little heart desires!
Since it's stinking hot outside and our cold drinks are likely to sweat, using a water-resistant vinyl is a must. Cricut's Premium Permanent Vinyl is up for the challenge! It is water resistant for up to five years, and repels the cup sweat like a champ!
Another thing that's really cool about Cricut's Premium Permanent Vinyl is that the carrier sheet (the paper backing on the vinyl) lies flat as it unrolls, which makes it super easy to apply! It drives me bonkers when a carrier sheet curls and I have to fight with it to line it up evenly!
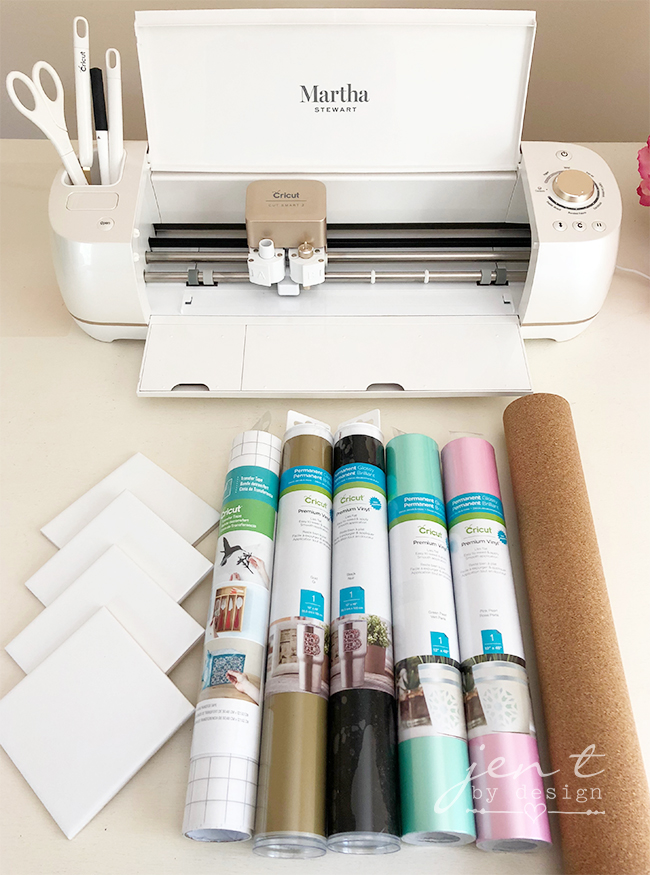
What You'll Need to Make these DIY Tile Coasters:
4.25" white tiles (I picked these up at Home Depot for 40 cents each)
Cricut Premium Permanent Vinyl in gold, black, green pearl, and pink pearl
Adhesive-backed thin cork (I bought this roll in the closet/organization aisle of Lowes)
Standard and strong grip cutting mats
This project in Design Space

Open the project in Design Space and click "Make It" at the bottom of the screen. The project will be divided onto mats by color. Apply each color of vinyl to a standard grip mat, then follow the prompts on the screen to cut out the designs. Be sure to set the Smart Dial to "Custom" and choose "Premium Vinyl" as the material. In the "Pressure" drop-down menu, select "more." (I've found that the extra pressure on this vinyl makes it a bit easier to weed).
Once all of the cuts are made, use scissors to cut out the pieces by project. Registration squares are on each piece to use as a guideline for lining up the layers in the correct place. Be sure to include the registration mark with each element when you cut the pieces out with the scissors.
Use the weeding tool to remove the negative vinyl. Apply transfer tape.
Begin adding the vinyl to the tiles. To avoid air bubbles use the scraper tool to help guide the vinyl onto the tile. If you happen to get air bubbles, the adhesive on the vinyl allows for repositioning, so simply lift a corner of the layer to release the air bubbles, then lay back down, using the scraper as a guide.
Layer the registration marks on top of each other to ensure proper placement of each layer.
Peel away the transfer tape and remove the registration squares. Press firmly all over the vinyl to make sure it is adhered well.

Next up, you'll want to add a thin layer of cork to the bottom of the coasters to prevent them from scratching any table surfaces. Instead of trying to cut precise squares with scissors, let the Cricut machine do the cutting for you! This awesome machine can cut over 100 different materials, and this thin cork happens to be one of them. So cool!
Simply create a 4-inch square in Design Space and duplicate until you have as many squares as you want to cut. From the machine materials list, choose "Cork, Adhesive Backed." Apply the cork adhesive-liner-side-down onto a strong grip mat, and cut away!
Once all of your squares are cut, remove the adhesive backing and apply the cork to the coasters.
*OPTIONAL: At this point, your pretty DIY Tile Coasters are ready to use! However, if you'd like an extra layer of protection, applying a layer of Mod Podge over the vinyl should do the trick. :)


I hope you've been inspired to create some fun DIY Tile Coasters of your own. If you do happen to make them, remember to share a pic on social media and tag me so I can see!
Thanks for visiting, and see ya next time. Cheers!!!
If you like these ideas, please "Like," "Pin," "Share" or "Tweet!" Or, you can just shout it from the rooftops, if that's your thing. Thanks bunches!!! :)
This is a sponsored conversation written by me on behalf of Cricut. The opinions and text are all mine. Affiliate links are included in this post, which means If you purchase something through the link, I may receive a small commission at no extra charge to you.