Valentine's Day Embroidery Hoop Decor with Cricut and Martha Stewart
/
Do you decorate for Valentine’s Day? I don’t know about you, but when all of the Christmas decorations come down, I feel like the house looks so empty and blah! Adding a little bit of life back into the decor for Valentine’s Day seems to perk things right back up.
Embroidery hoop crafts are all the rage right now, so I thought it might be fun to give this trendy craft a Valentine’s Day twist. With just a few materials, I was able to whip this Valentine’s Day Embroidery Hoop craft up in a jiffy, and I’m gonna show you how you can, too!
What You’ll Need:
This project in Design Space
12-inch embroidery hoop
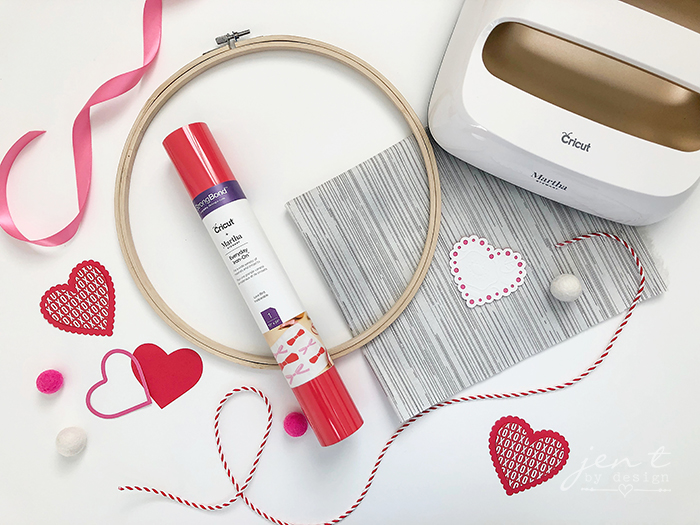
1/3 yard of fabric, plus a few inches
Assorted card stocks or patterned papers. I used white, pink, and red card stock and one piece of patterned paper.
Cricut Cutting Machine (I used the Cricut Explore Air 2 Martha Stewart Bundle, but any Cricut cutting machine will work)
EasyPress Mat or a Towel
Felt balls
Ribbon and/or twine
Hot glue gun
Scissors
Pop dots (optional)
How to Make a Valentine’s Day Embroidery Hoop Wall Hanging
Begin by opening this project in Design Space. Decide which papers you would like to use for each Martha Stewart heart, then using your Cricut cutting machine, follow the prompts to cut the papers.
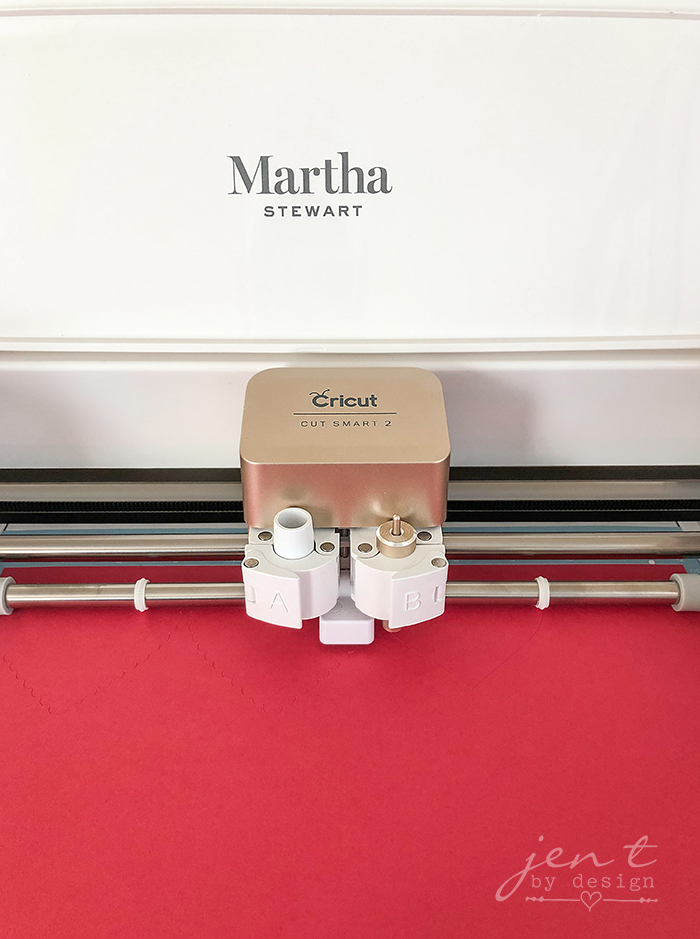

When you get to the iron-on layer, be sure to toggle the mirror image button to the “on” position. We do this because when we cut iron-on, we are basically cutting in reverse so that the finished product displays properly on our project. Also, be sure to place the iron-on material shiny side down on the mat, as shown above.


For this project, I used Cricut’s Martha Stewart Everyday Iron-On. There are a slew of colors and patterns to choose from, but for Valentine’s Day I thought that “Love Bird” Red would be perfect. :)
The Everyday Iron-On is my favorite to use because it is so easy to weed. There’s nothing worse than creating a beautiful cut, then having to fight to get the negative vinyl off. The Everyday Iron-On excess peels right off like a dream! If you’re familiar with weeding, you know how valuable this is!
It also comes with a StrongBond™ Guarantee, which means that when you use the Iron-On as directed, Cricut guarantees that you’ll be fully satisfied with the results…or they’ll give you your money back! Kind of hard to go wrong with a material that has that kind of guarantee, right?

Next, preheat your Cricut EasyPress 2 using this Interactive Quick Reference Guide. The guide will help you determine what temperature your EP2 needs to be set to based on the fabric that you are using, as well as how long you will need to press your project. One of the most awesome things about the EasyPress 2 is that it yields professional quality results in a minute or less. Yes, you read that right…a minute or less! SO fast, and SO good!!!
The EP2 has precise temperature control up to 400 degrees, allowing you to set the exact temperature that you need to achieve the perfect adhesion for your project. It also comes with a safety base that you can preheat the press on, and includes an auto-shutoff feature, as well.
And can we just talk about how pretty this Martha Stewart EasyPress 2 is? I mean, just look at that classy gold and pearl finish!

Once your EasyPress 2 is preheated, it’s time to press! Place an EasyPress Mat or a towel on a hard, flat surface like a countertop. Preheat the fabric with the EP2 for five seconds. This will help remove any moisture in your fabric and help ensure a good adhesion.
Place the hoop over the fabric to determine exactly where you’d like your iron-on to go, remove the hoop, then press the project. I used cotton fabric, so my setting was 315 degrees for 30 seconds. When the timer beeps, flip the project over and heat the back side for 15 seconds. Let cool slightly, then peel the carrier sheet away while the project is still warm.

Next, center the fabric into the hoop and tighten it. Flip the hoop over and trim the excess fabric away with a pair of scissors. If you’d like to keep the fabric really secure, you can add hot glue over the seam in the back.


Use hot glue to secure your heart pieces together, then hot glue the assembled hearts onto the hoop frame. If you’d like to add a little dimension to some of the hearts, you can add a pop dot to the back of a few, then hot glue the pop dots to the frame.

Hot glue two felt balls to the ends of some red and white twine, then secure around the hoop hardware so that the balls dangle above the “love” text. Add a ribbon loop to the hardware to serve as a hook for the wall.
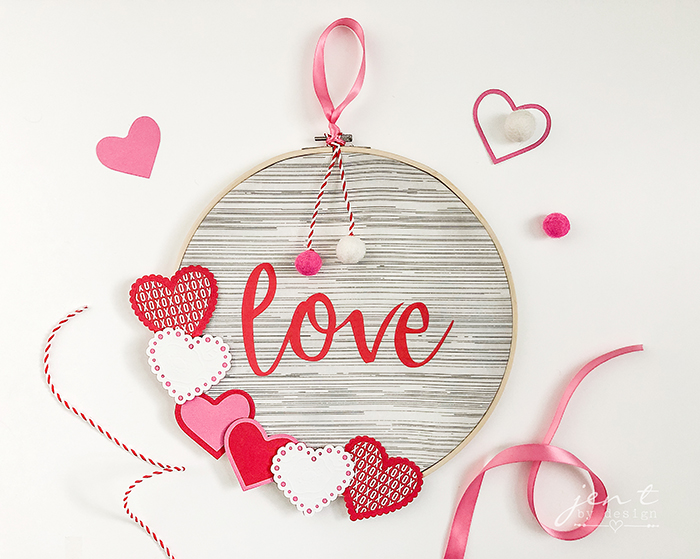
So cute, right?!! Now all that’s left to do is decide where to hang it! It’s a super cute way to jazz up your living space, but it would also look great in a work office, in a classroom, or even in your kiddo’s room! Have fun mixing up the fabrics, papers, and ribbon colors to create exactly the look you love, and don’t forget to share pics on social media and tag me so I can see! My social accounts are below.
Also, if you love this project, don’t miss some of the other work that I’ve done in collaboration with Cricut and Martha Stewart:


If you like these ideas, please "Like," "Pin," "Share" or "Tweet!" Or, you can just shout it from the rooftops, if that's your thing. Thanks bunches!!! :)
This is a sponsored conversation written by me on behalf of Cricut. The opinions and text are all mine.